How to Set Up WhatsApp AI in ODIO: Complete Step-by-Step Guide
Setting up WhatsApp AI in ODIO enables businesses to automate customer communication, launch targeted campaigns, and manage conversations from a single platform. Whether you're onboarding for the first time or configuring a new business account, this guide walks you through every step required to get started.
From creating your ODIO account and connecting your WhatsApp Business Number to configuring departments and preparing your workspace, this article covers everything you need before launching your first WhatsApp campaign.
By following this guide, you'll have a fully configured WhatsApp AI workspace that's ready to automate customer engagement and streamline business communication.
What You'll Learn
In this guide, you'll learn how to:
- Create your ODIO account
- Activate your WhatsApp AI subscription
- Configure your WhatsApp AI workspace
- Create departments
- Connect your WhatsApp Business Number
- Create WhatsApp Message Templates
- Build chatbot workflows
- Launch WhatsApp campaigns
- Manage customer groups using CRM
- Monitor campaign analytics and conversations
Before You Begin
Before starting the setup process, make sure you have the following information ready.
Prerequisites
- A valid email address
- Company details
- Mobile number
- Website URL
- Business address
- State and PIN Code
- Preferred Time Zone
- Payment method
- Access to your Meta Business Account
Having these details ready will help you complete the onboarding process without interruptions.
Create an ODIO Account
Your ODIO account is the foundation of your WhatsApp AI workspace. It allows you to manage your WhatsApp Business Numbers, departments, templates, workflows, campaigns, customer data, and analytics from a centralized dashboard.
Before you can access any WhatsApp AI features, you must first create an account and activate your subscription.
What You'll Do in This Section
You'll learn how to:
- Select a WhatsApp AI plan
- Register your account
- Add company information
- Complete subscription payment
Once completed, you'll gain access to the WhatsApp AI Dashboard.
Step 1: Select a WhatsApp AI Plan
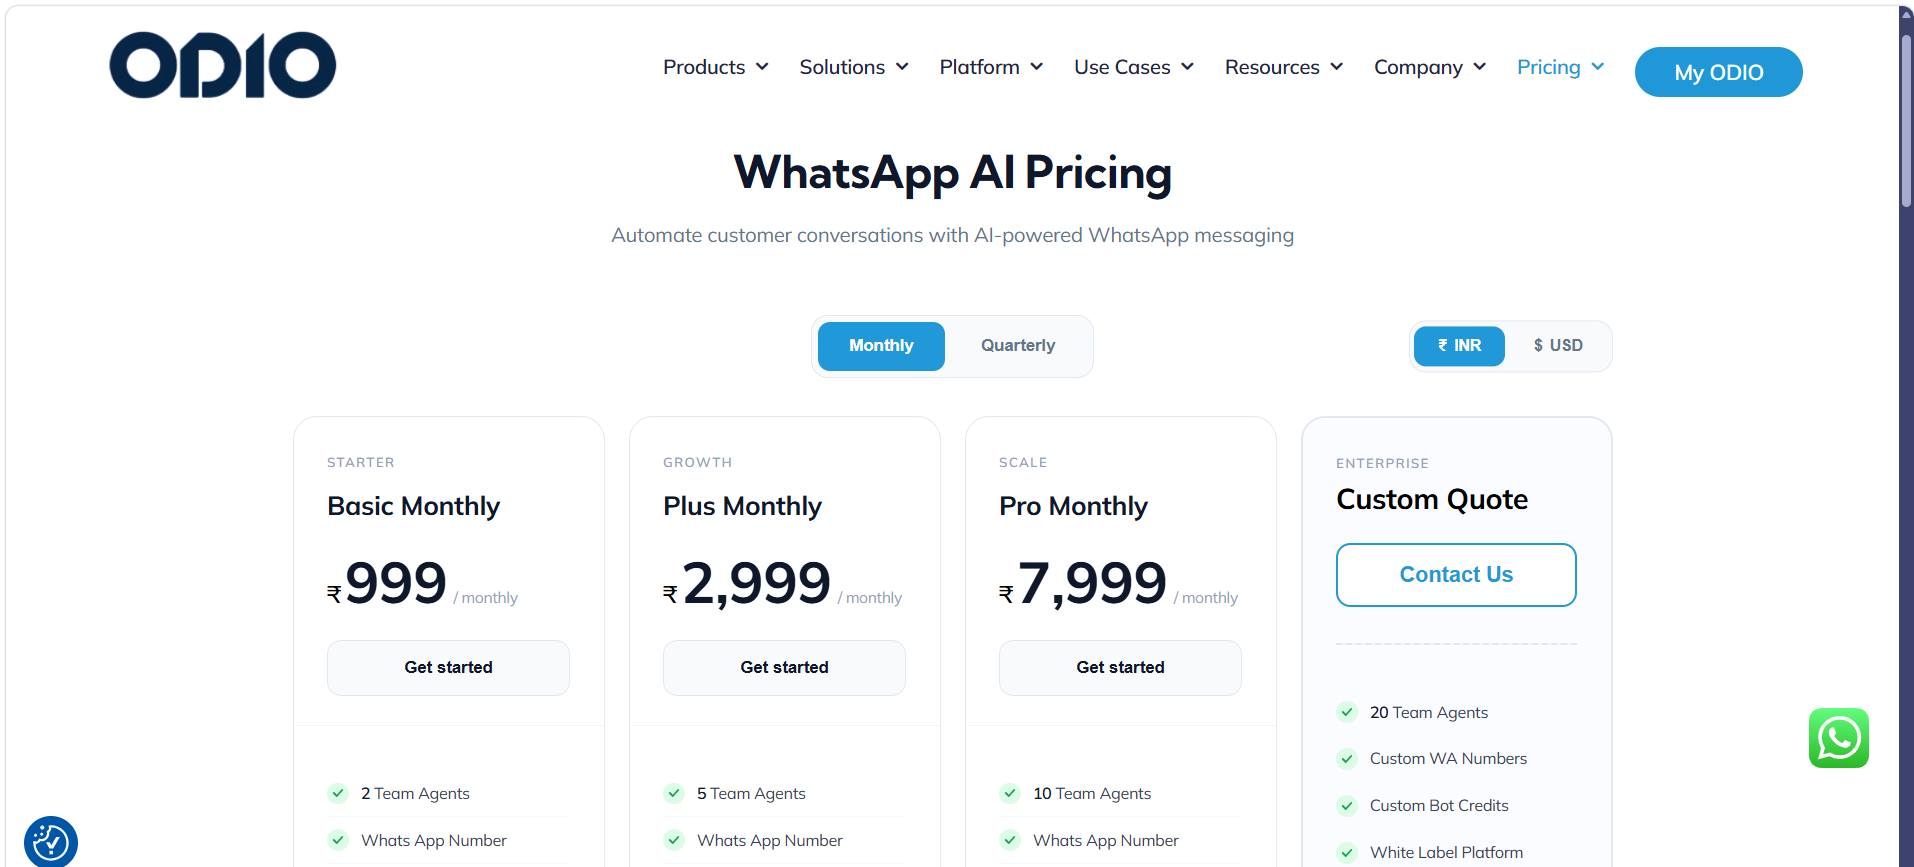
- Visit odioiq.com
- Click Pricing from the navigation bar.
- Scroll down to the WhatsApp AI Pricing section.
- Choose the plan that best fits your business requirements.
- Click Get Started.
Step 2: Register Your Account
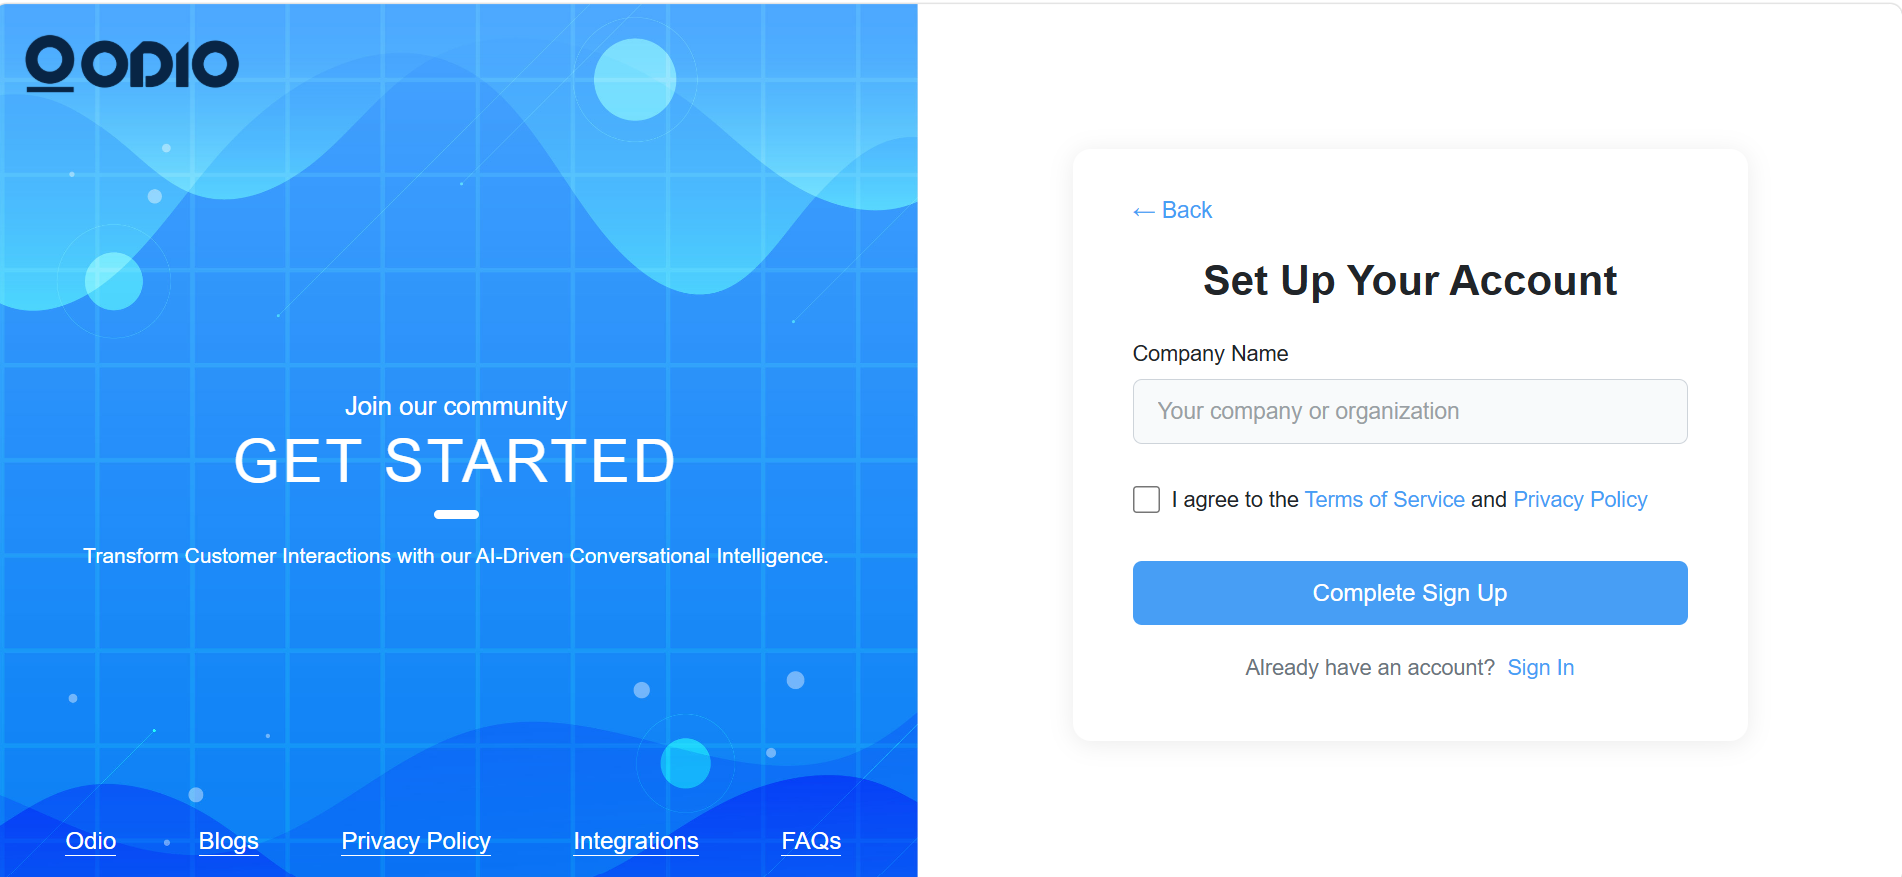
ODIO allows you to create an account using two different methods.
- Continue with Google
- Continue with Email
Select your preferred option and continue with the registration process.
Step 3: Enter Company Information
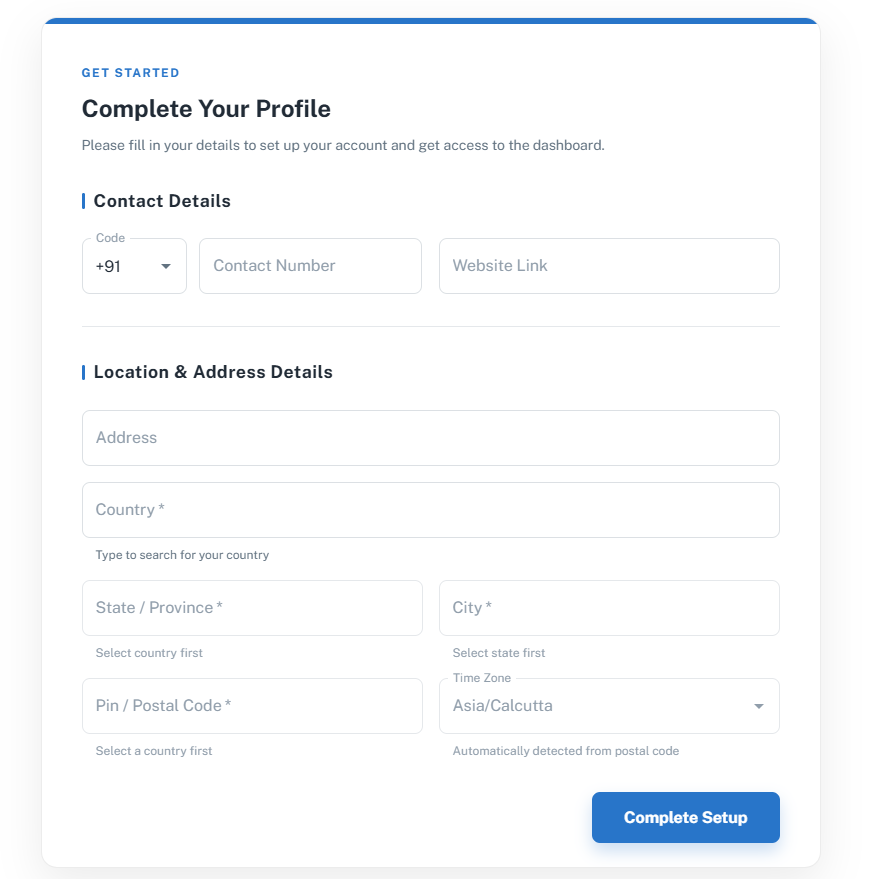
After successful registration, you'll be prompted to enter your business information. Complete the following details:
- Company Name
- Mobile Number
- Website
- Company Address
- State
- PIN Code
- Time Zone
After entering all the required information, click Create Account.
Step 4: Complete Billing
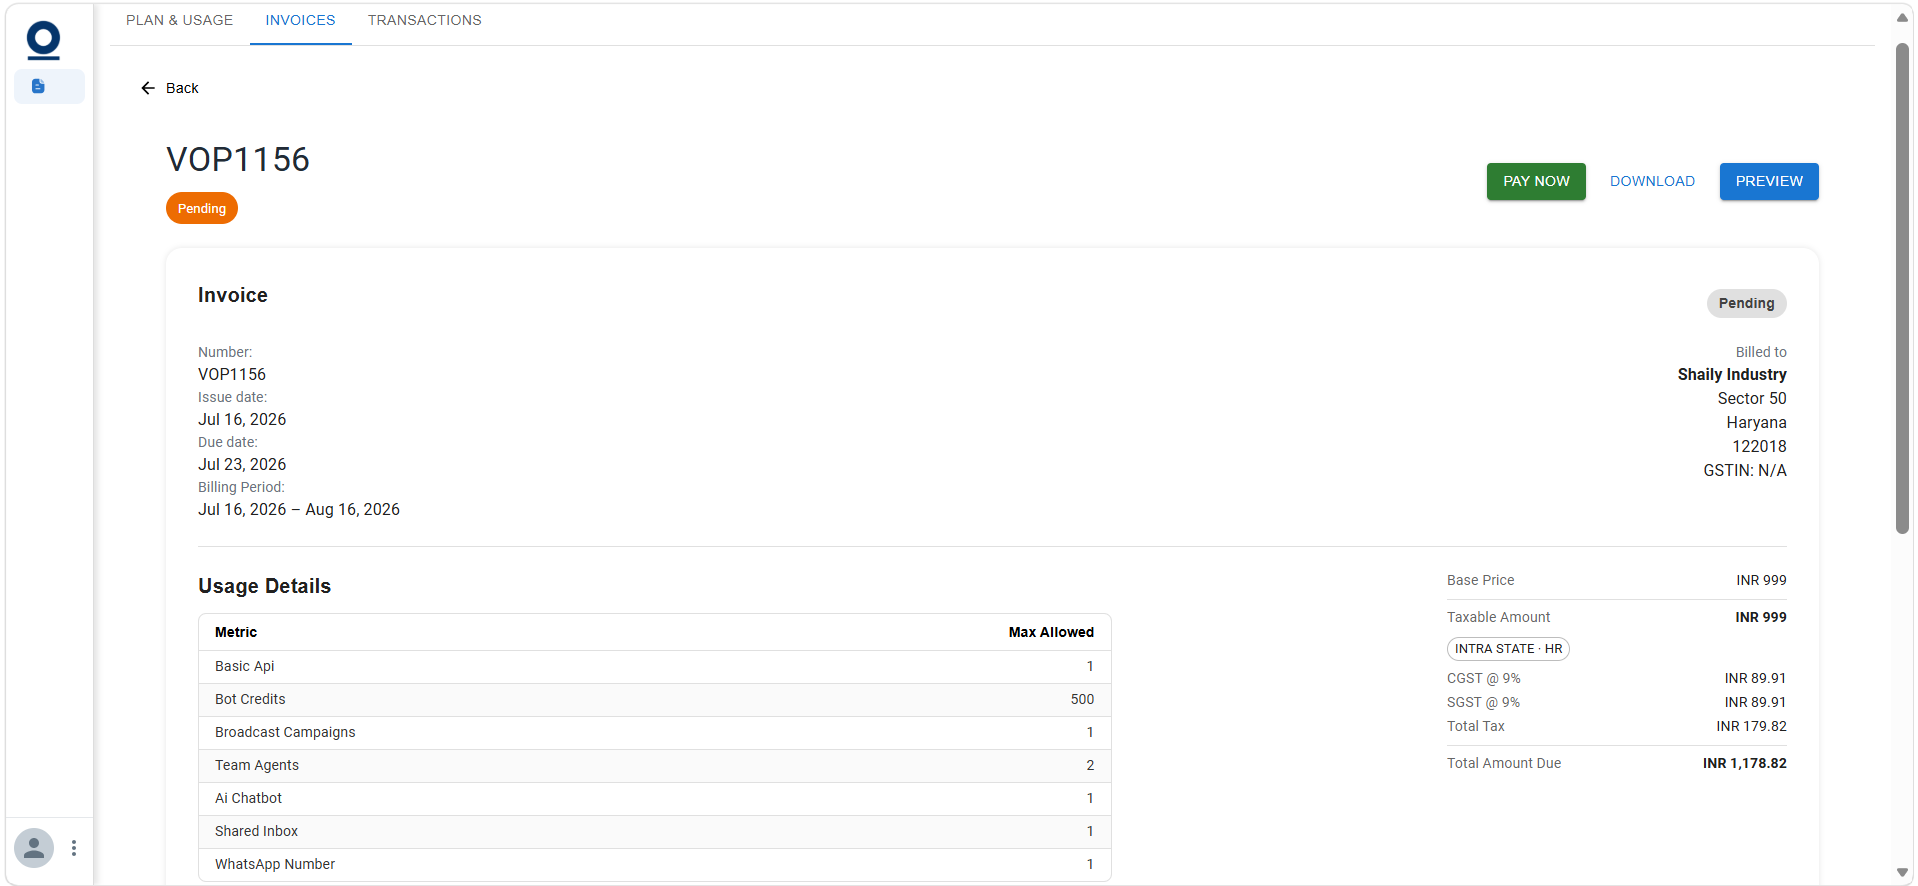
Once your account has been created, you'll be redirected to the Billing page. Review your selected subscription plan and invoice before completing the payment.
To activate your subscription:
- Verify the invoice.
- Click Pay Now.
- Complete the payment process.
After successful payment, your WhatsApp AI subscription will be activated automatically.
Expected Outcome
After completing this section, you will have:
- Created your ODIO account
- Activated your WhatsApp AI subscription
- Access to the WhatsApp AI Dashboard
You're now ready to configure your workspace.
Configure Your WhatsApp AI Workspace
Once your subscription has been activated, the next step is configuring your WhatsApp AI workspace.
The workspace serves as the central environment where you'll organize departments, connect WhatsApp Business Numbers, create templates, design chatbot workflows, launch campaigns, and monitor customer conversations.
A properly configured workspace ensures every module works together efficiently and supports seamless customer communication.
What You'll Configure
The initial setup consists of:
- Departments
- WhatsApp Business Numbers
- Message Templates
- Workflows
- Campaigns
- Analytics
Each component builds upon the previous one, so it's recommended to complete the setup in the order outlined in this guide.
Create Departments
Departments help organize different teams within your organization. Instead of managing all users and campaigns from a single workspace, departments allow you to separate communication by business function.
Examples include:
- Sales
- Customer Support
- Marketing
- Operations
- HR
Using departments keeps your workspace organized while improving campaign management, reporting, and user access.
Why Departments Matter
Departments are used throughout the platform. Once created, they become available while:
- Connecting WhatsApp Business Numbers
- Creating Templates
- Building Workflows
- Launching Campaigns
- Adding Customers
This structured approach simplifies collaboration across different teams.
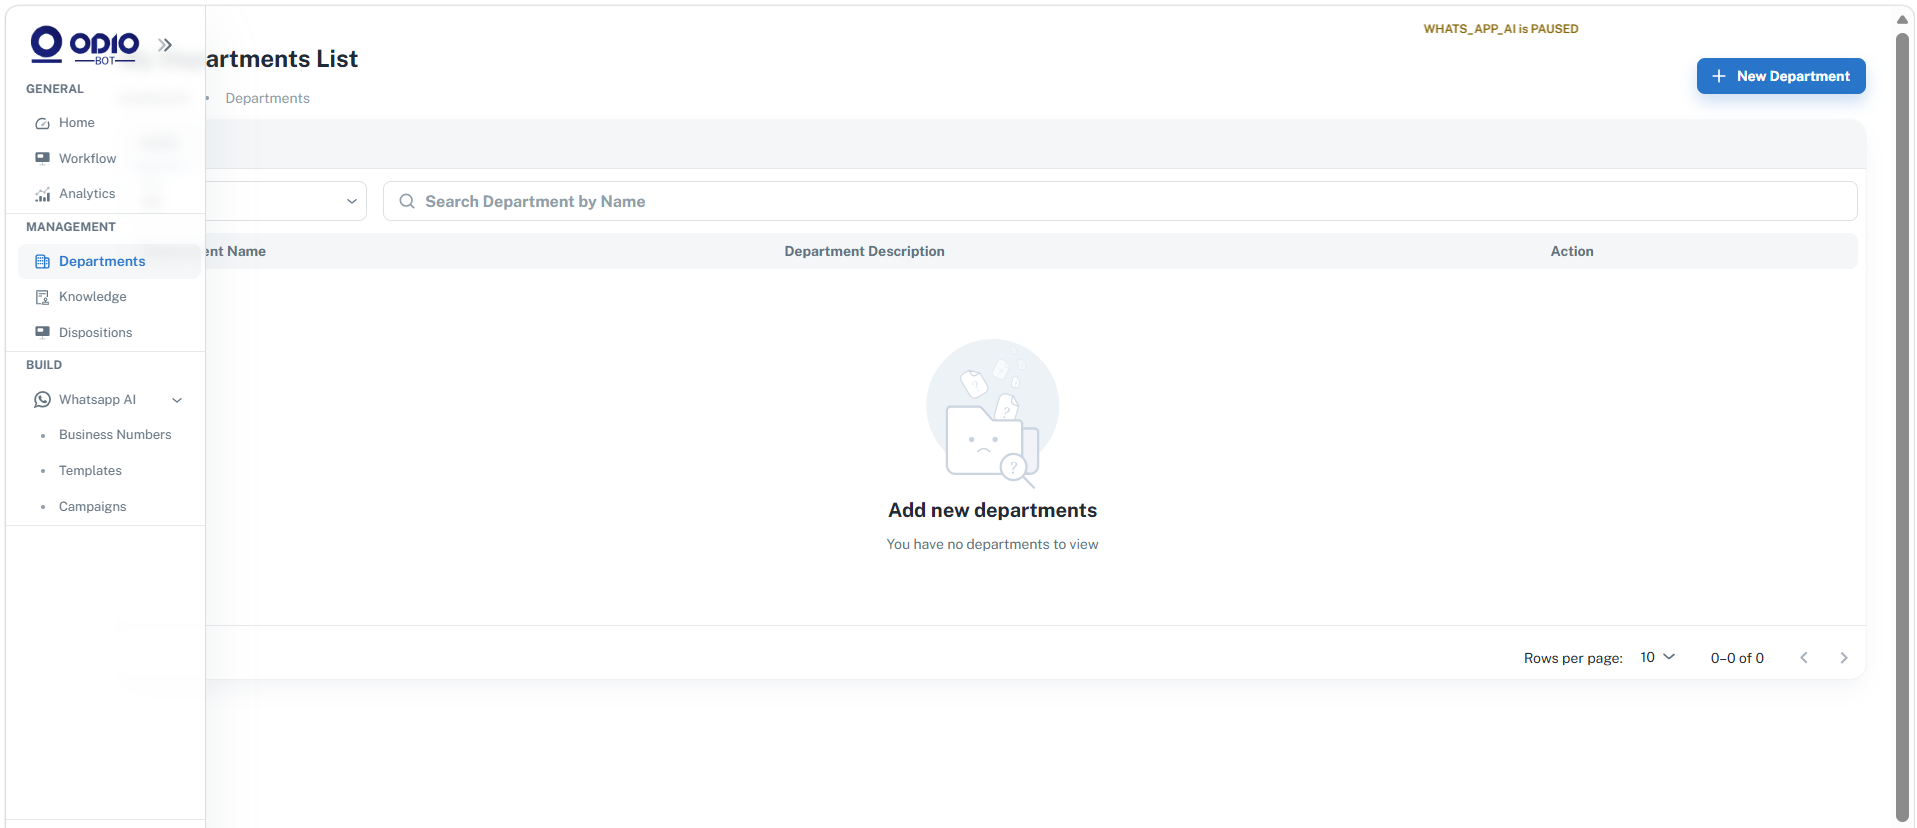
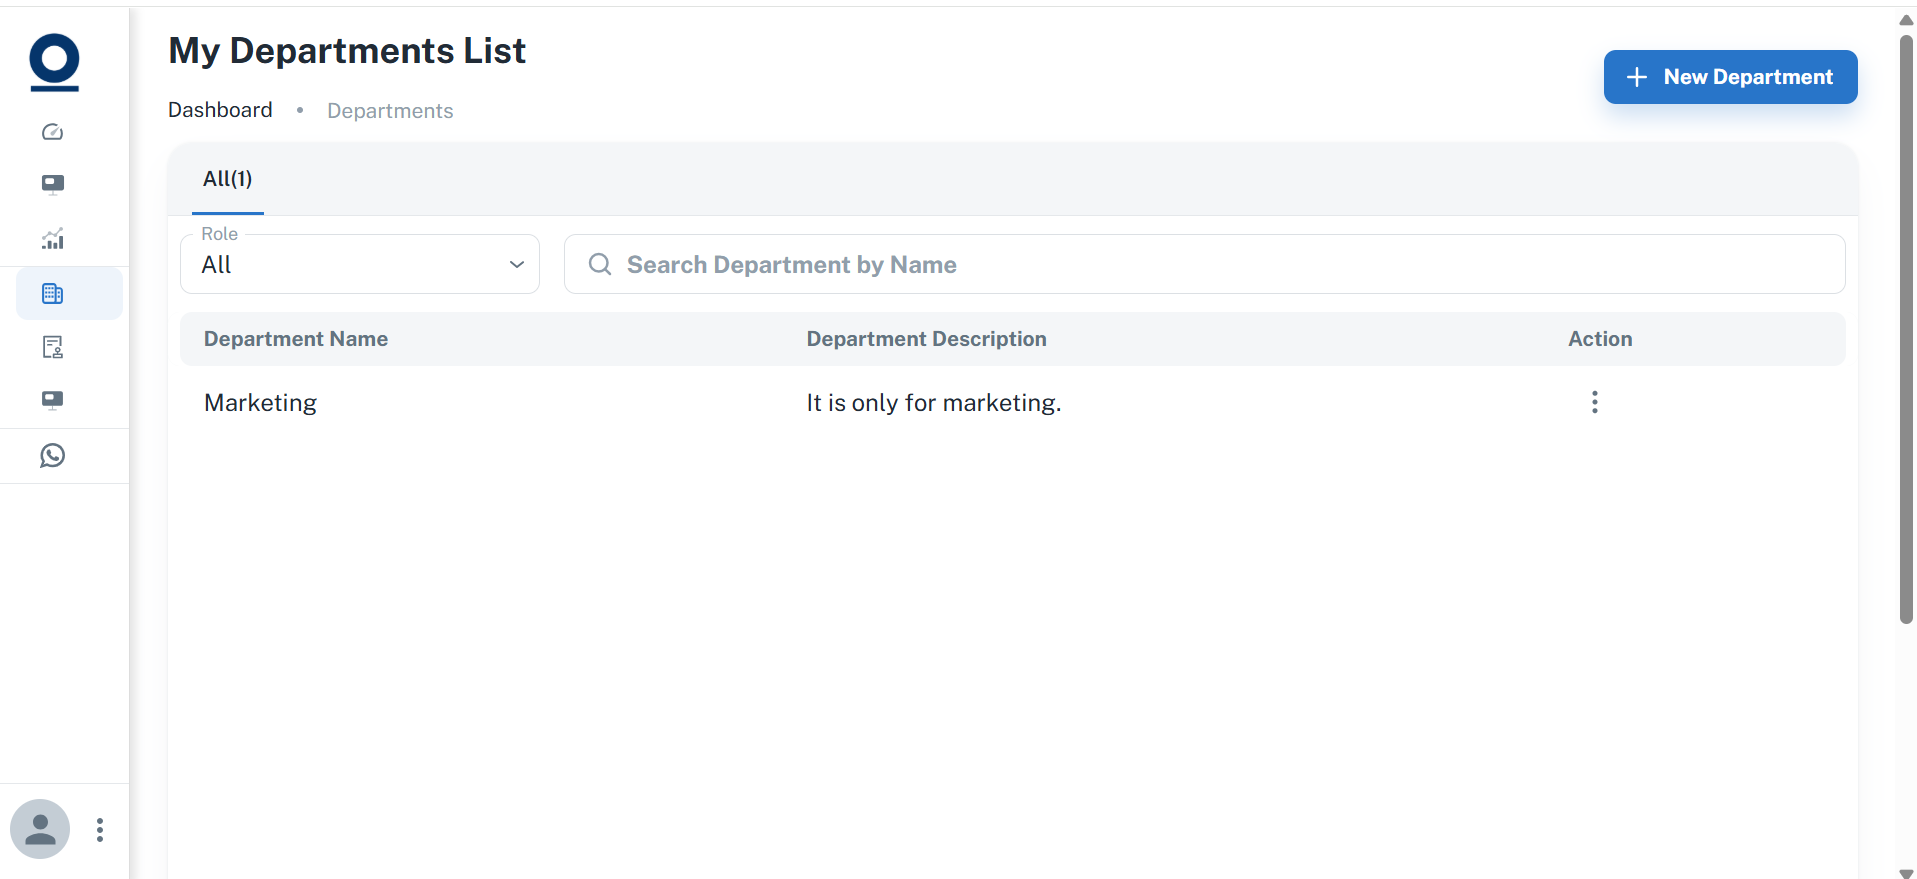
Create a New Department
- Navigate to Management → Departments.
- Click New Department.
- Enter Department Name and Department Description.
- Click Create Department.
Your department will now be available across the platform.
Best Practices
- Create separate departments for Sales, Marketing, and Support.
- Use meaningful department names.
- Avoid duplicate departments.
Expected Outcome
After completing this section, you'll be able to:
- Assign departments while creating templates.
- Associate workflows with departments.
- Run department-specific campaigns.
- Organize customers by business function.
Connect Your WhatsApp Business Number
Your WhatsApp Business Number is the primary communication channel between your business and customers. Every message template, workflow, campaign, and customer interaction depends on a successfully connected and verified WhatsApp Business Number.
Without connecting a verified number, WhatsApp campaigns cannot be executed.
Why Connect a WhatsApp Business Number?
Connecting your business number allows ODIO to communicate with Meta and send messages on behalf of your organization. Once connected, you'll be able to:
- Submit templates for Meta approval
- Launch WhatsApp campaigns
- Receive customer replies
- Automate chatbot conversations
- Monitor conversation analytics
This is one of the most important steps in the onboarding process.
Before You Begin
Ensure the following prerequisites are ready:
- Business Information
- Meta Business Account
- WhatsApp Business Account (WABA)
- WhatsApp Business Profile
- Mobile Number for Verification
If you don't already have a WhatsApp Business Account, you'll be able to create one during the onboarding process.
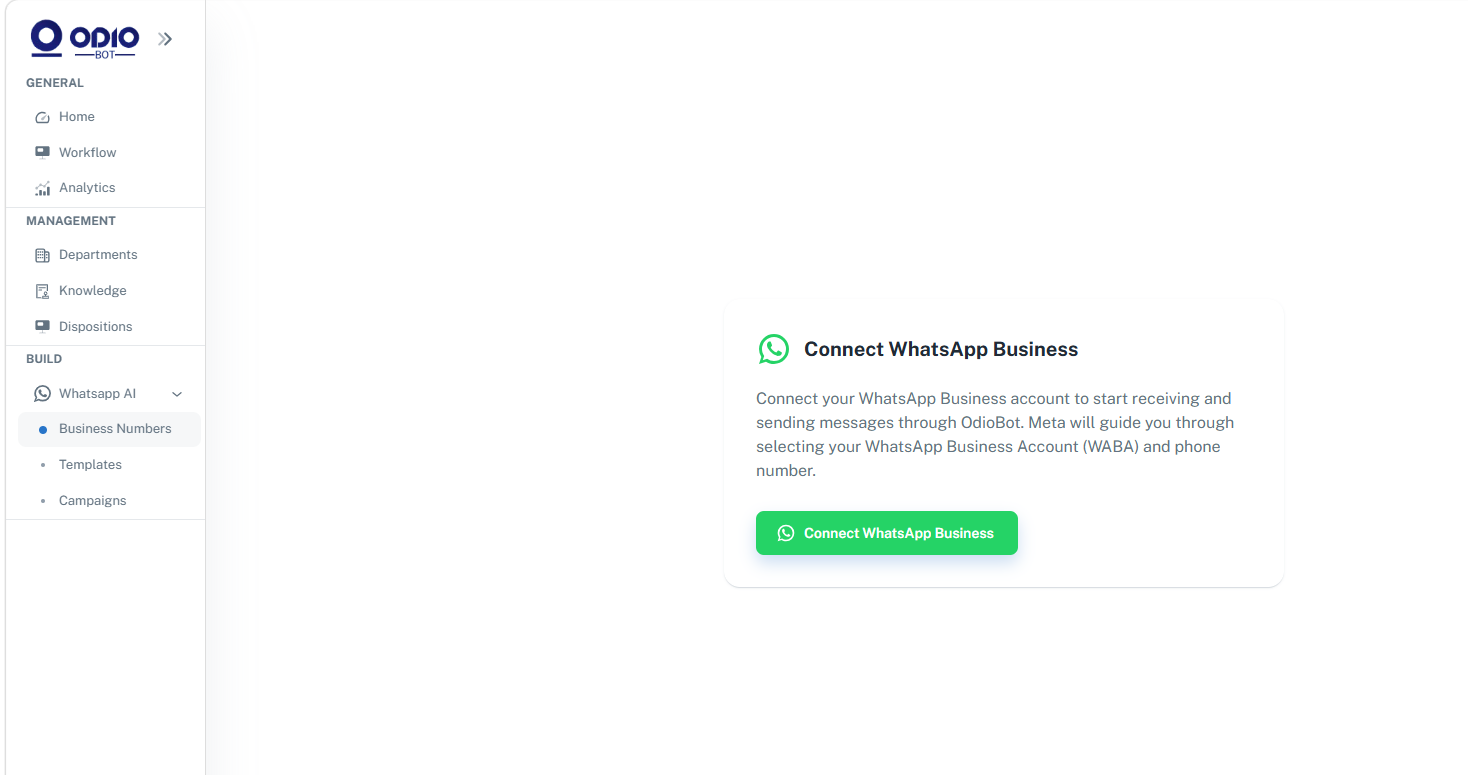
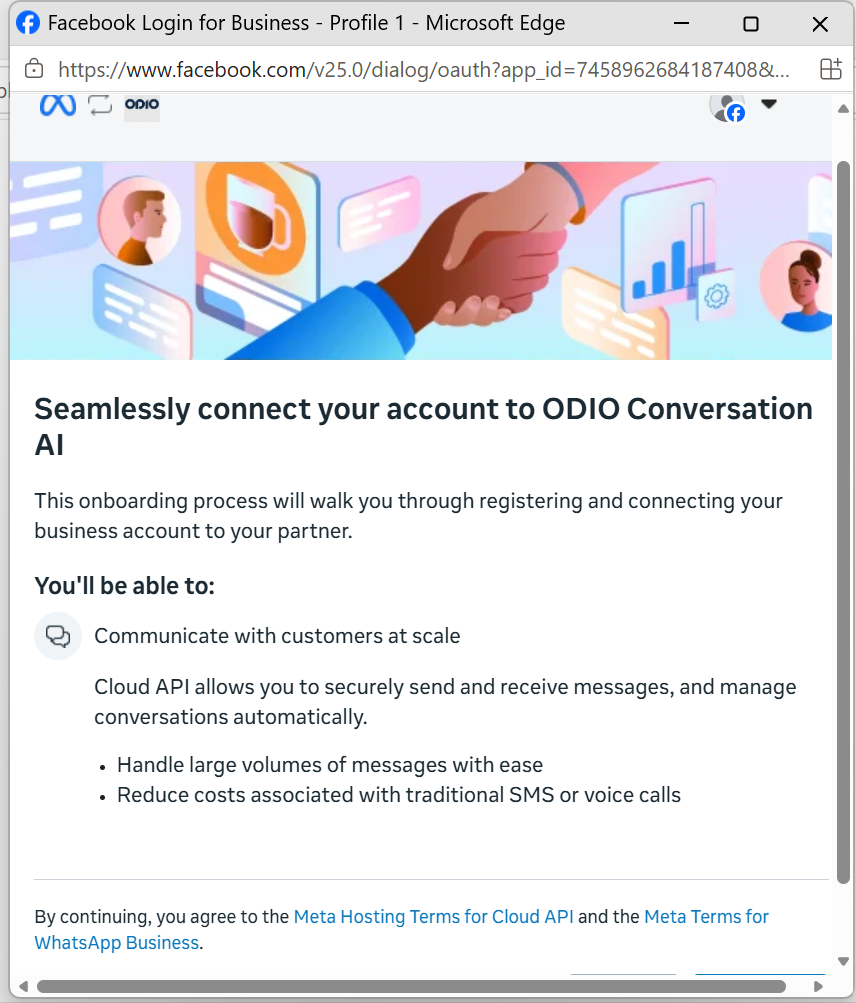
Connect Your Business Number
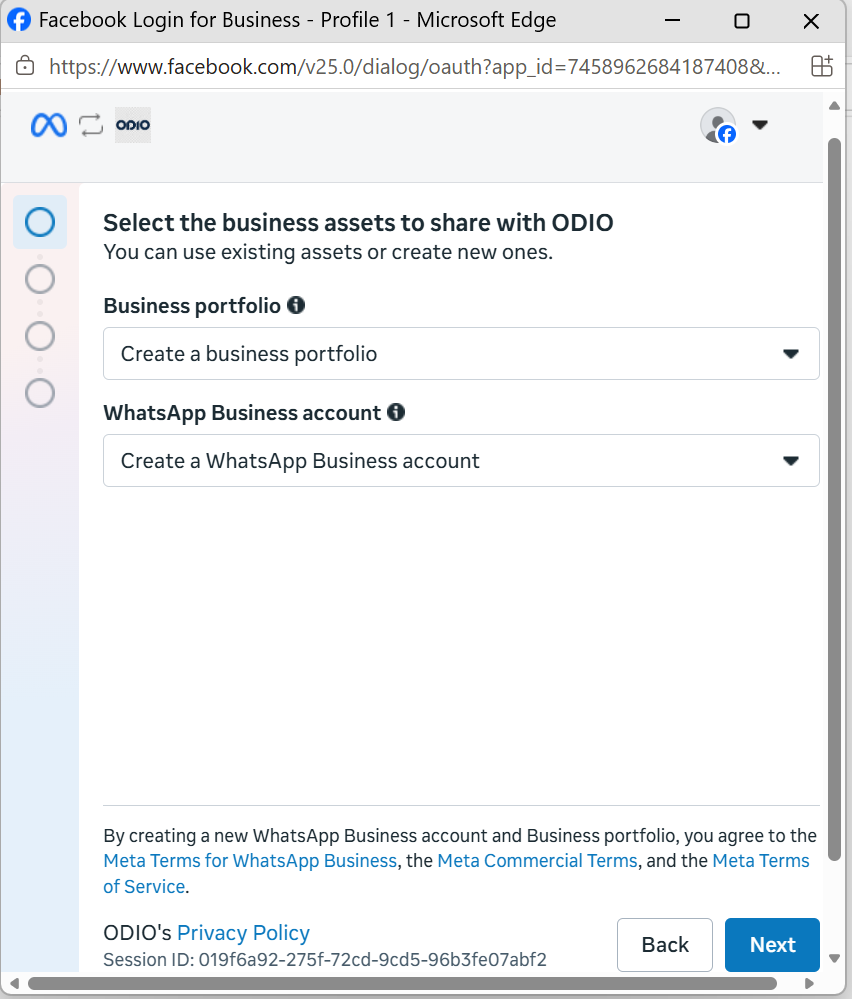
- Navigate to Build → Business Numbers.
- Click Add New Number.
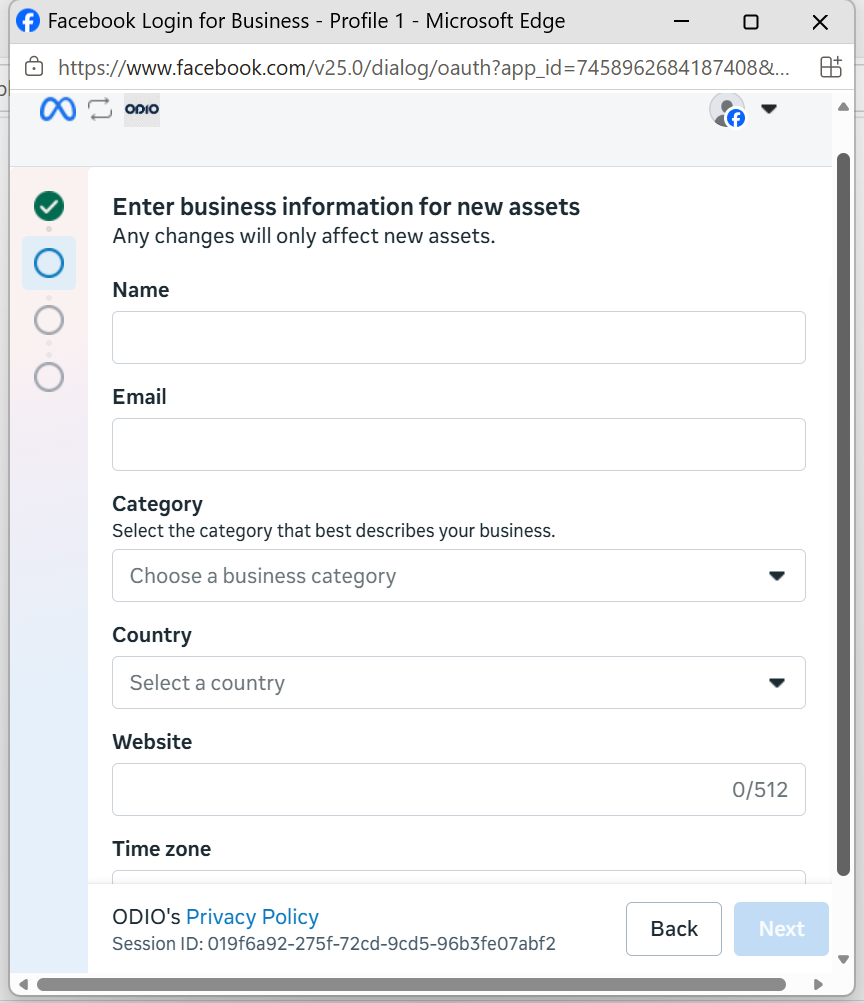
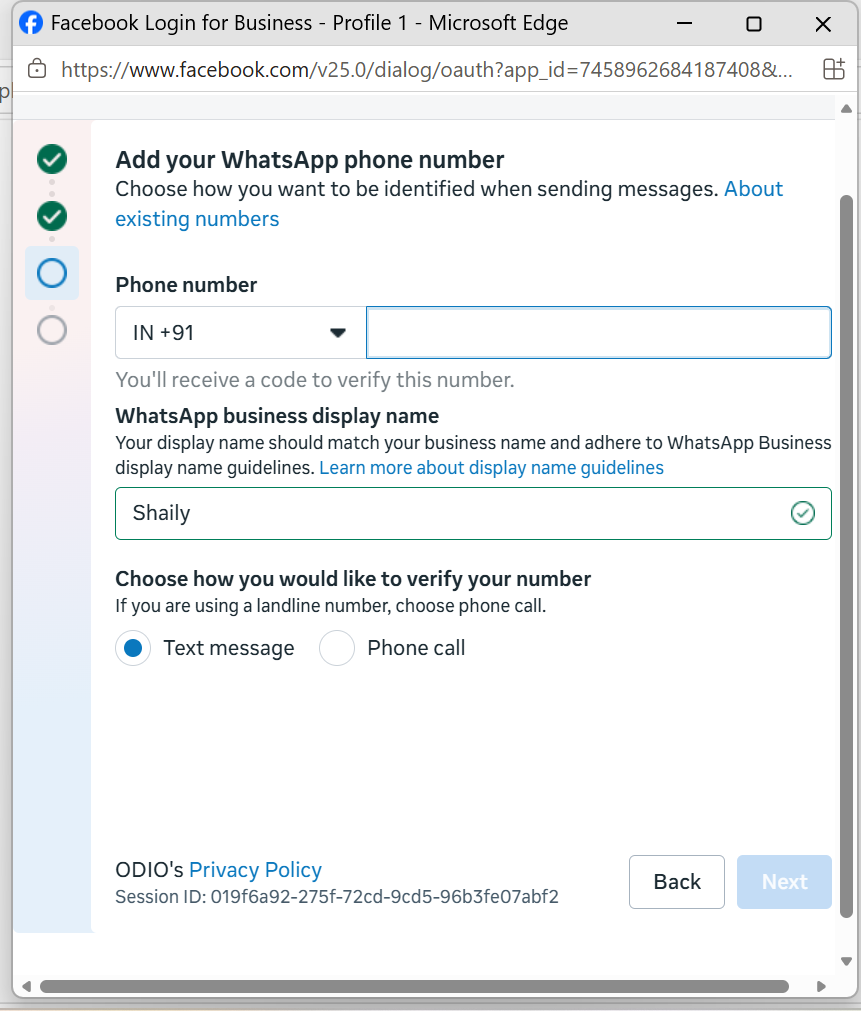
- Complete the onboarding process: fill in business information, select or create a WABA, configure your WhatsApp Business Profile, and add your mobile number.
- Complete the verification process if prompted.
- Click Save.
Once completed, your WhatsApp Business Number will be available while creating templates and campaigns.
Create WhatsApp Message Templates
Message Templates are pre-approved WhatsApp messages that allow businesses to initiate conversations with customers outside the 24-hour customer service window. Every outbound message sent through WhatsApp campaigns must use a Meta-approved template.
Templates ensure your communication complies with WhatsApp Business policies while maintaining consistency across marketing, utility, and service notifications.
What You'll Do in This Section
- Create a new WhatsApp Message Template
- Configure template details
- Submit templates for Meta approval
- Understand the approval process
- Prepare templates for campaign usage
Why Message Templates Matter
WhatsApp requires businesses to use Meta-approved templates before sending outbound messages. Every template is reviewed by Meta to ensure it complies with WhatsApp Business policies. Once approved, templates can be reused across multiple campaigns, helping maintain consistency in customer communication.
Create a New Message Template
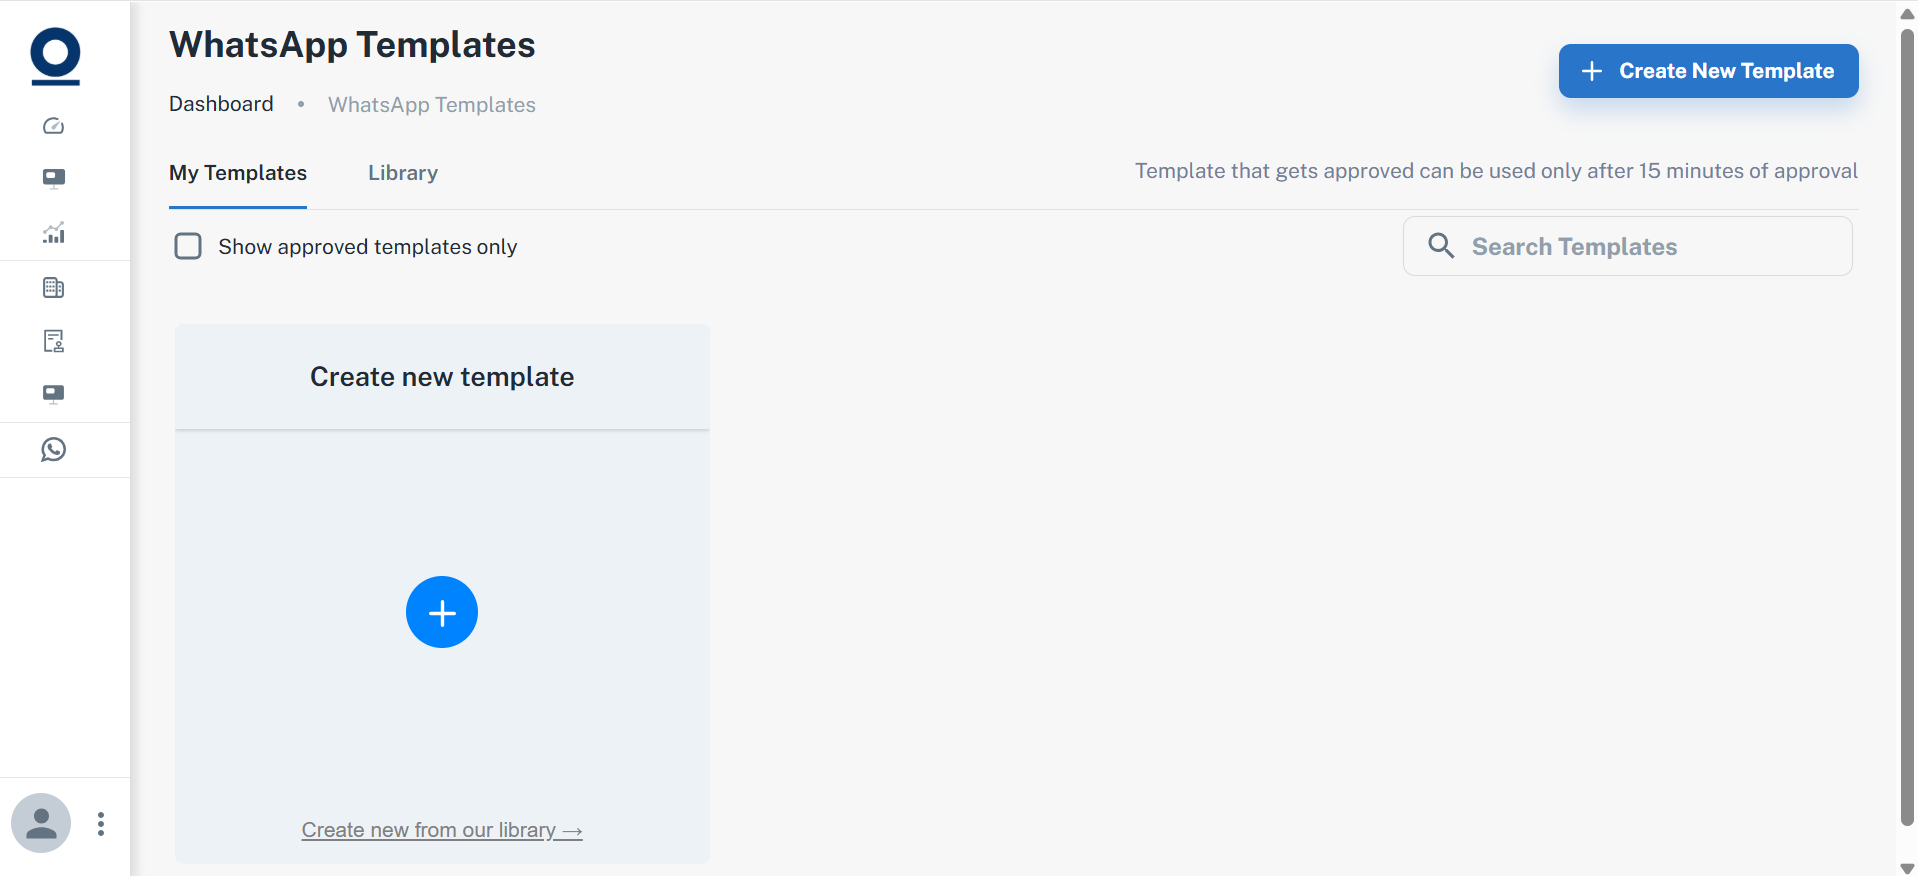
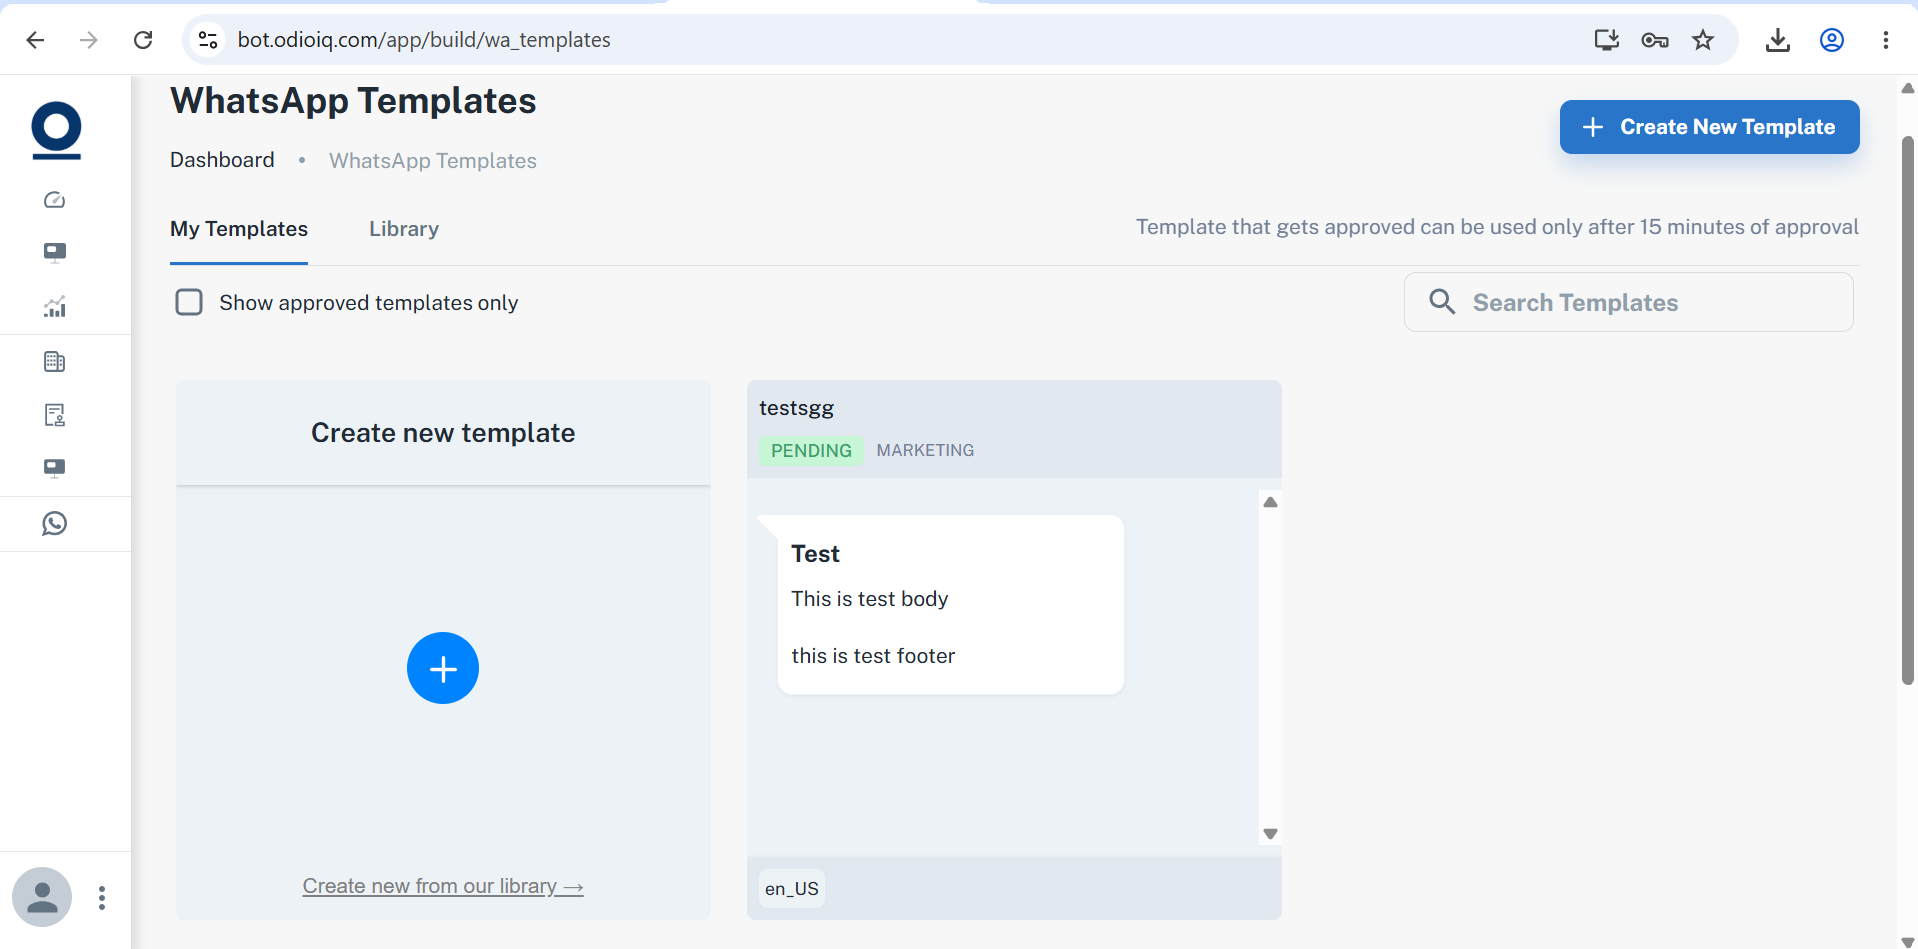
- Navigate to Templates from the dashboard.
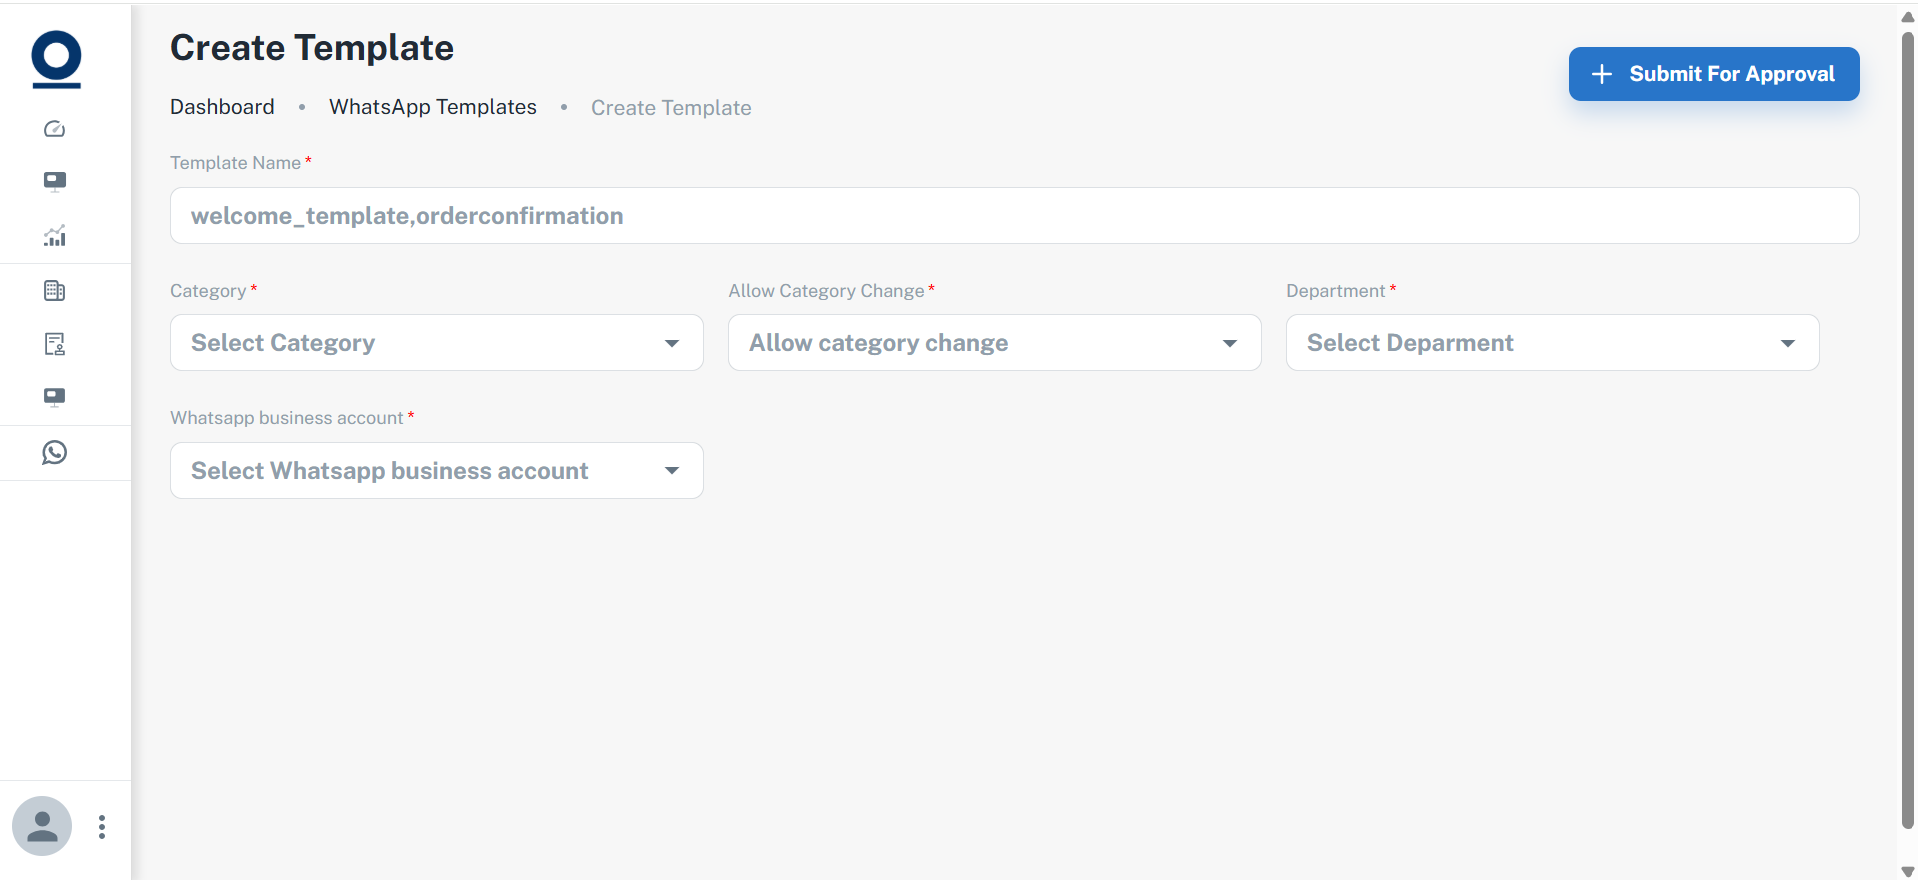
- Click Create New Template.
- Enter Template Name, Template Category, Department, and WhatsApp Business Account.
- Add a Message Header (optional).
- Enter the Message Body.
- Add a Footer (optional).
- Review all details.
- Click Submit for Approval.
Your template will now be submitted to Meta for review.
Meta Approval Process
After submission, Meta reviews your template before it becomes available for campaigns. During the review process:
- Status remains Pending Approval
- Template cannot be used in campaigns
- Once approved, status changes to Approved
Best Practices
- Use clear and professional language.
- Choose the correct template category.
- Avoid excessive promotional wording.
- Review spelling and placeholders before submission.
Expected Outcome
After completing this section, you'll have a Meta-approved WhatsApp Message Template ready to use in campaigns.
Build a Workflow
A workflow defines how your chatbot communicates with customers. It controls conversation flow, customer interactions, and automation logic.
Properly configured workflows reduce manual effort while delivering faster and more consistent customer support.
What You'll Do
- Create a workflow
- Configure chatbot settings
- Build conversation flows
- Activate workflows
Create a Workflow
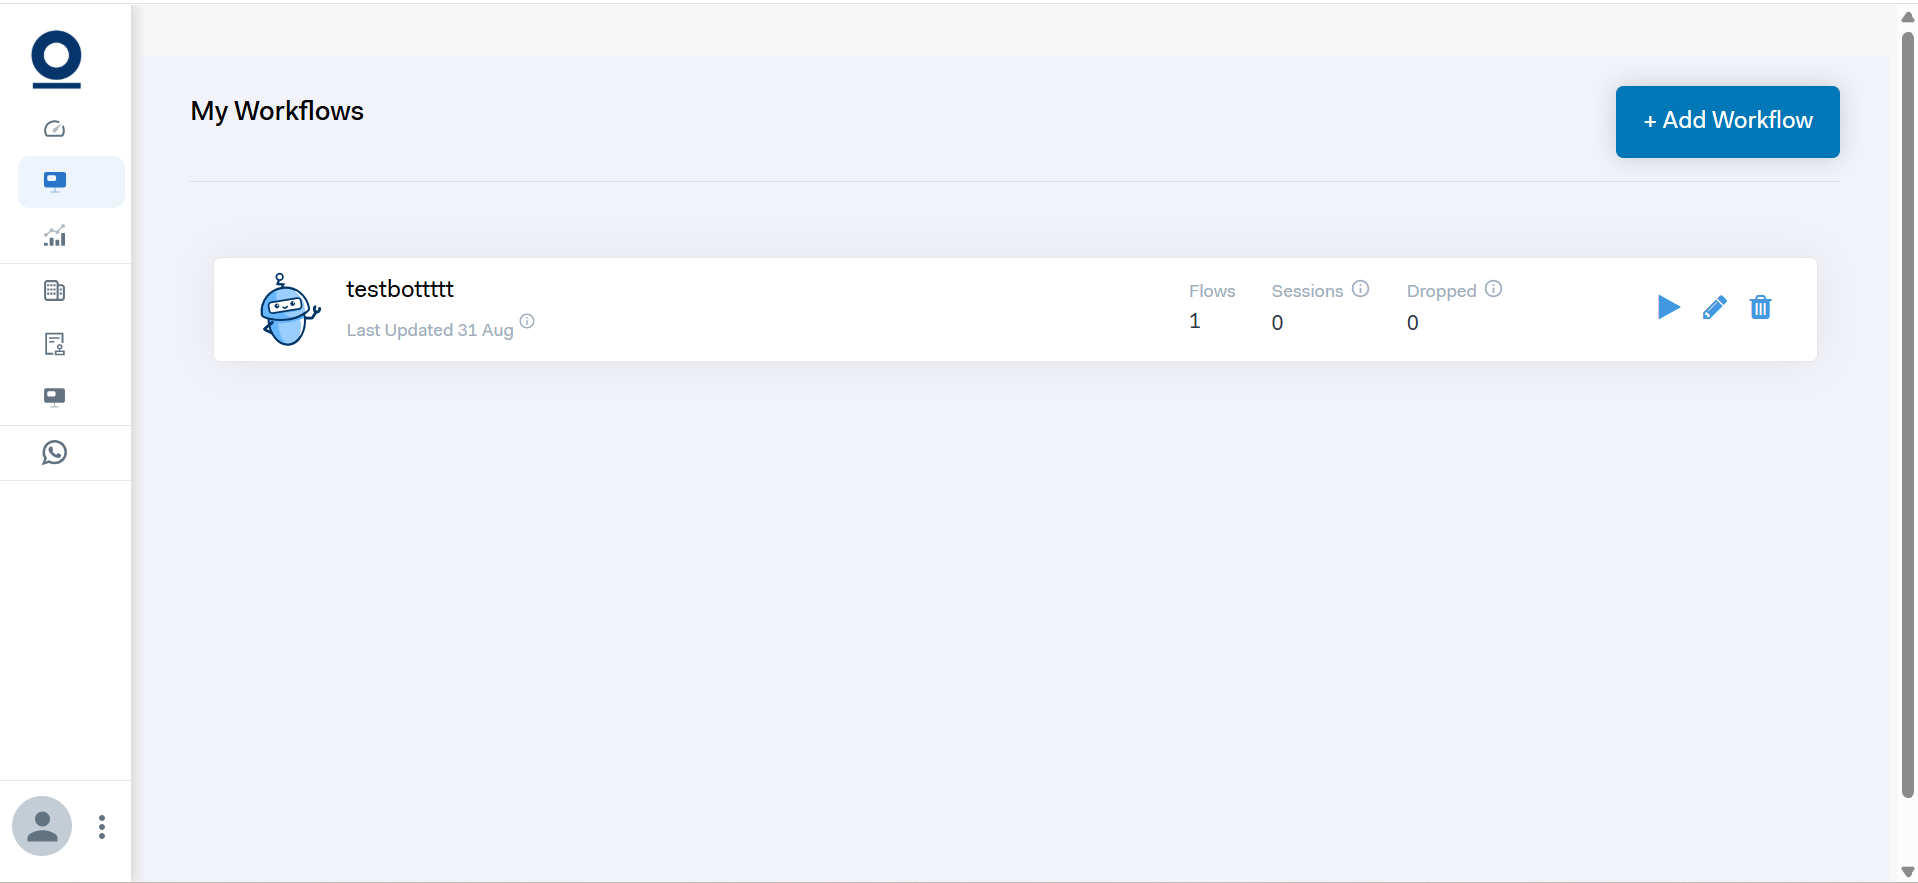
- Navigate to Workflows.
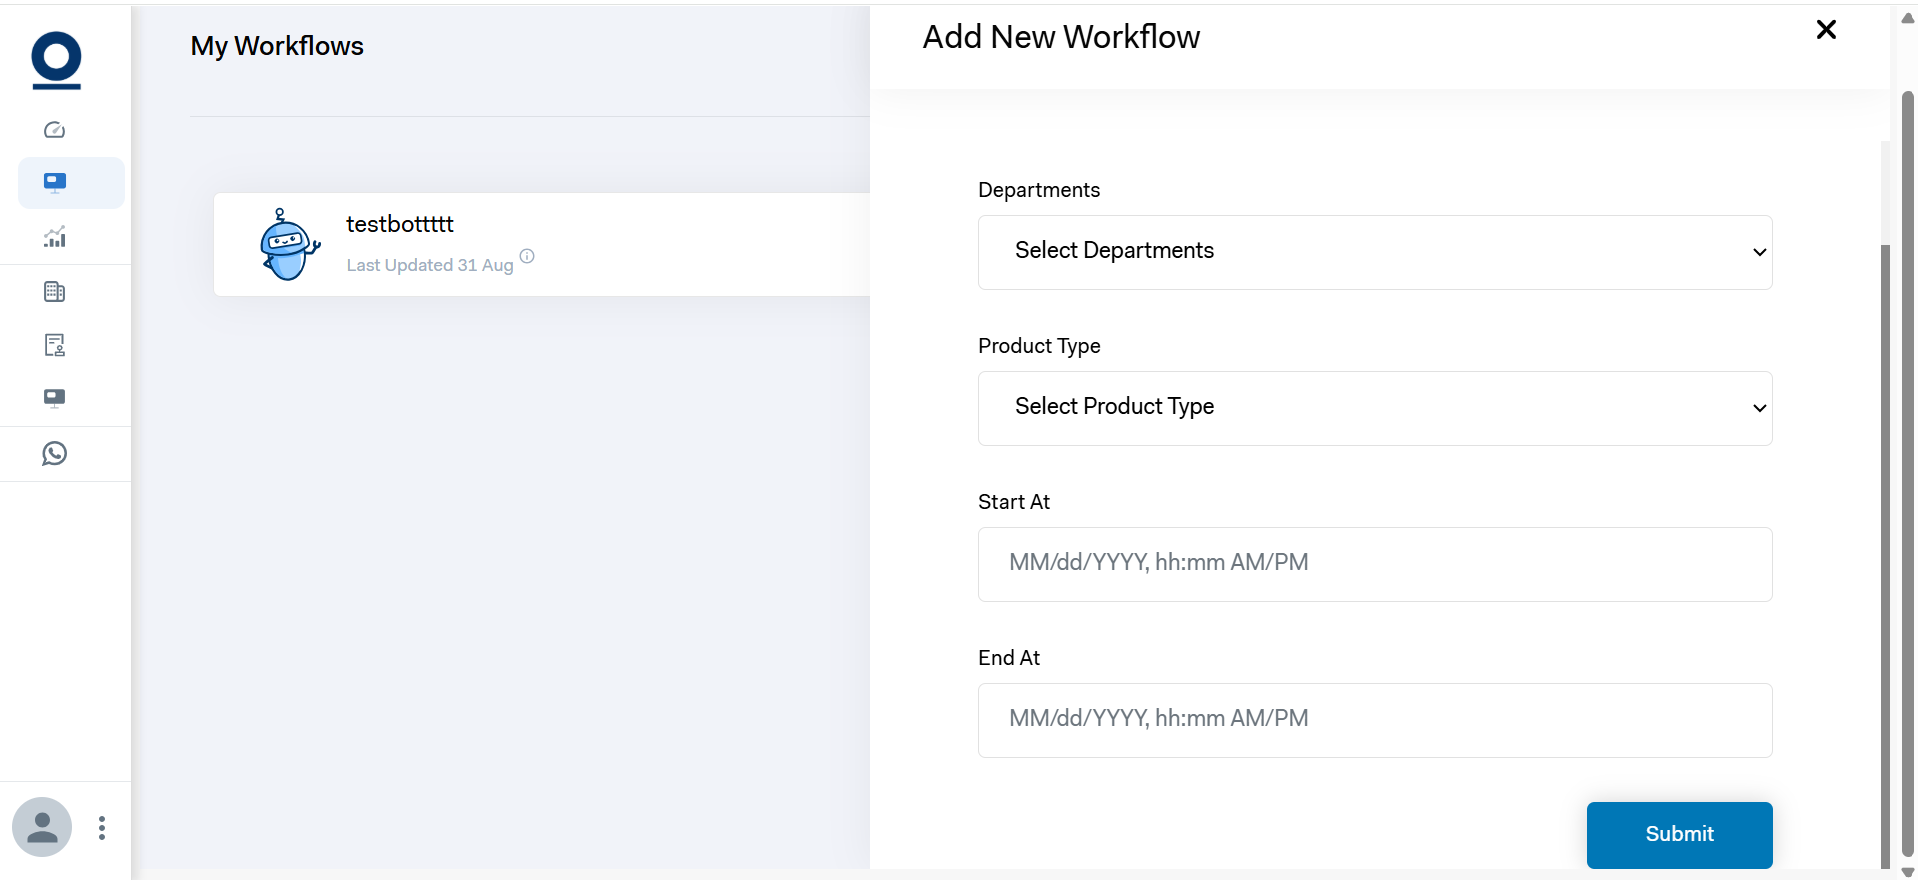
- Click Create New Workflow.
- Enter Chatbot Name, Department, Product Type, Start Date & Time, and End Date & Time.
- Click Submit.
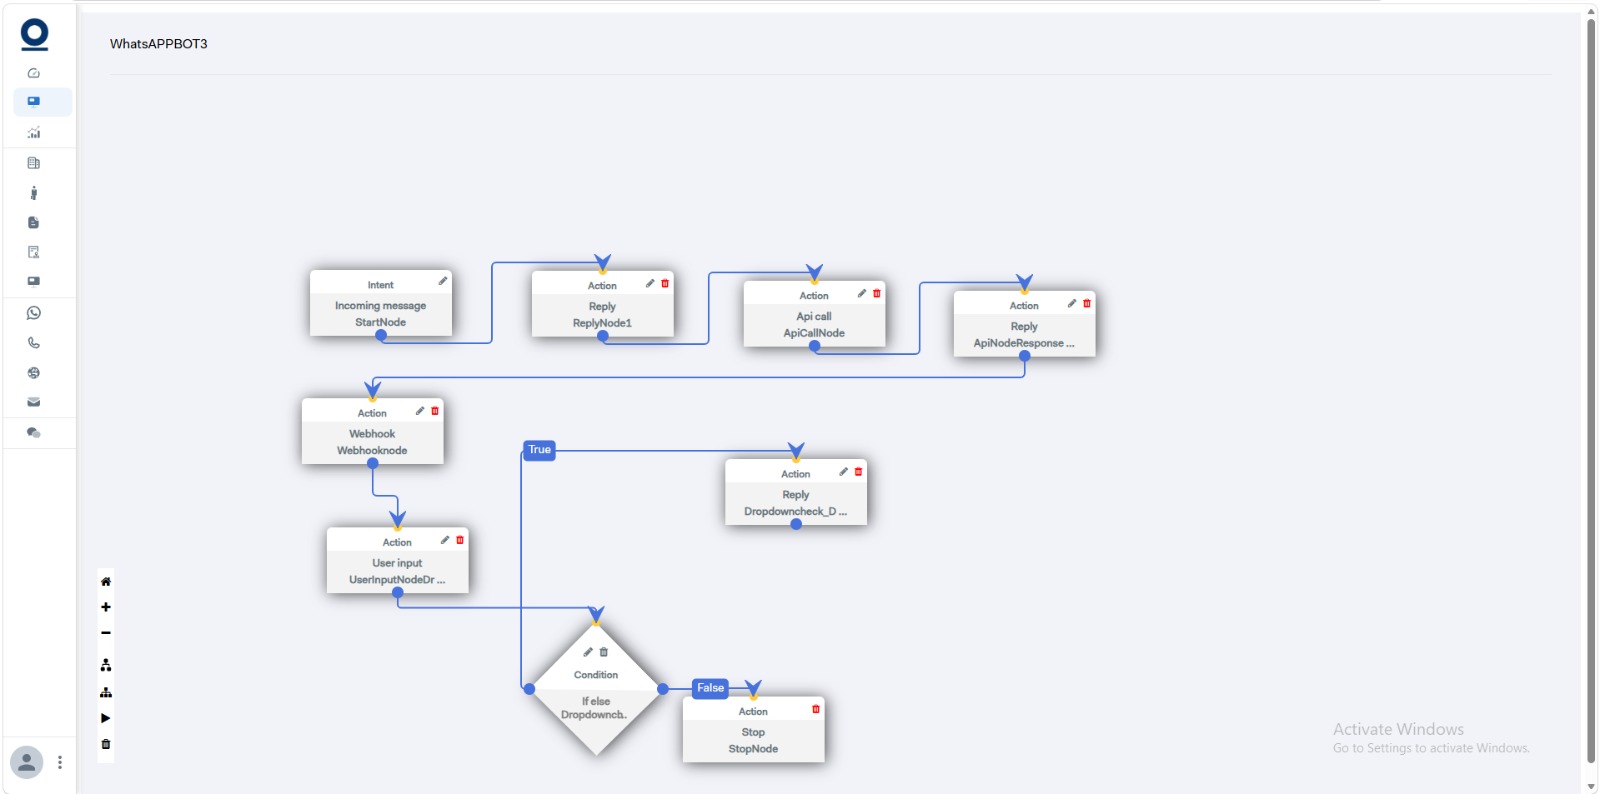
Configure the Workflow
After creating the workflow:
- Add the required workflow nodes.
- Design the conversation flow.
- Connect the nodes.
- Save your changes.
- Click Resume to activate the workflow.
Best Practices
- Keep workflows simple.
- Test every conversation path.
- Add fallback responses.
- Review workflows before activating them.
Expected Outcome
Once activated, the workflow will automatically manage customer conversations based on your configured logic.
Create & Launch Campaigns
Campaigns allow businesses to send WhatsApp messages to customers using approved templates. ODIO supports two methods of selecting recipients:
- Uploading a CSV file
- Using Customer Groups from the CRM Module
Both methods support immediate as well as scheduled campaign delivery.
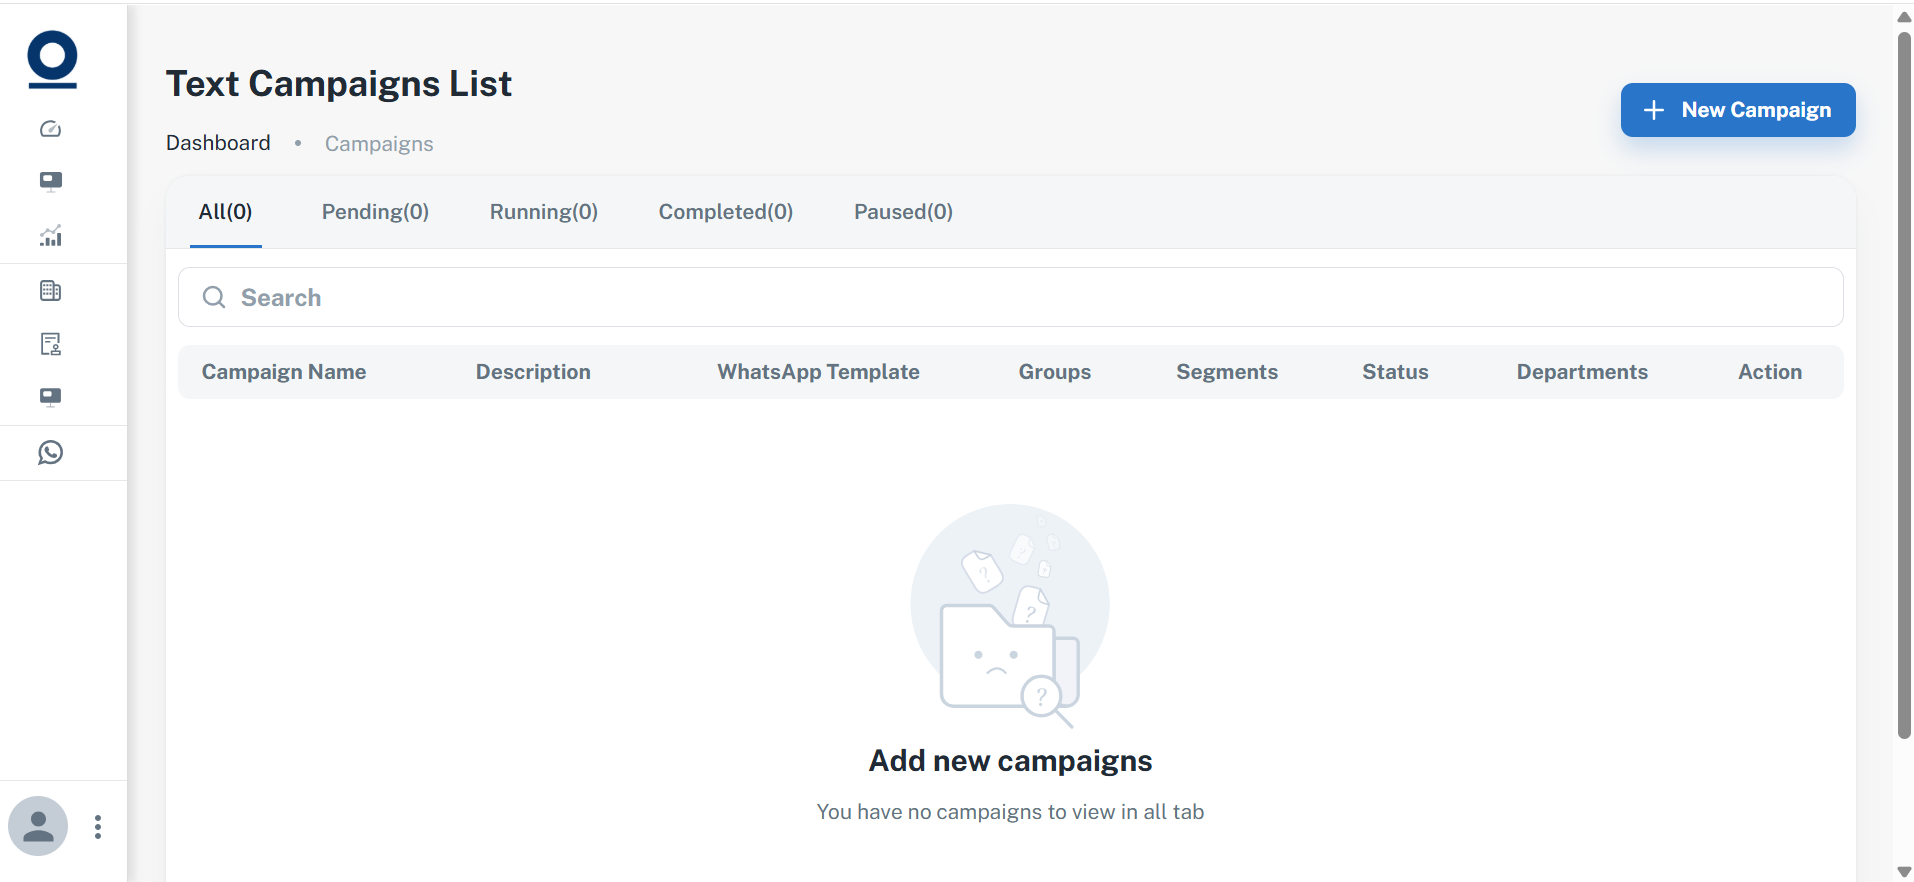
Create a Campaign
- Navigate to Campaigns.
- Click Create Campaign.
- Enter Campaign Name, Description, Department, Business Phone Number, Approved Template, and Campaign Status.
After completing these details, choose your preferred recipient method.
Method 1: Upload Customers Using CSV
Uploading a CSV file is ideal when sending campaigns to a new audience.
- Select Upload CSV.
- Upload your customer file.
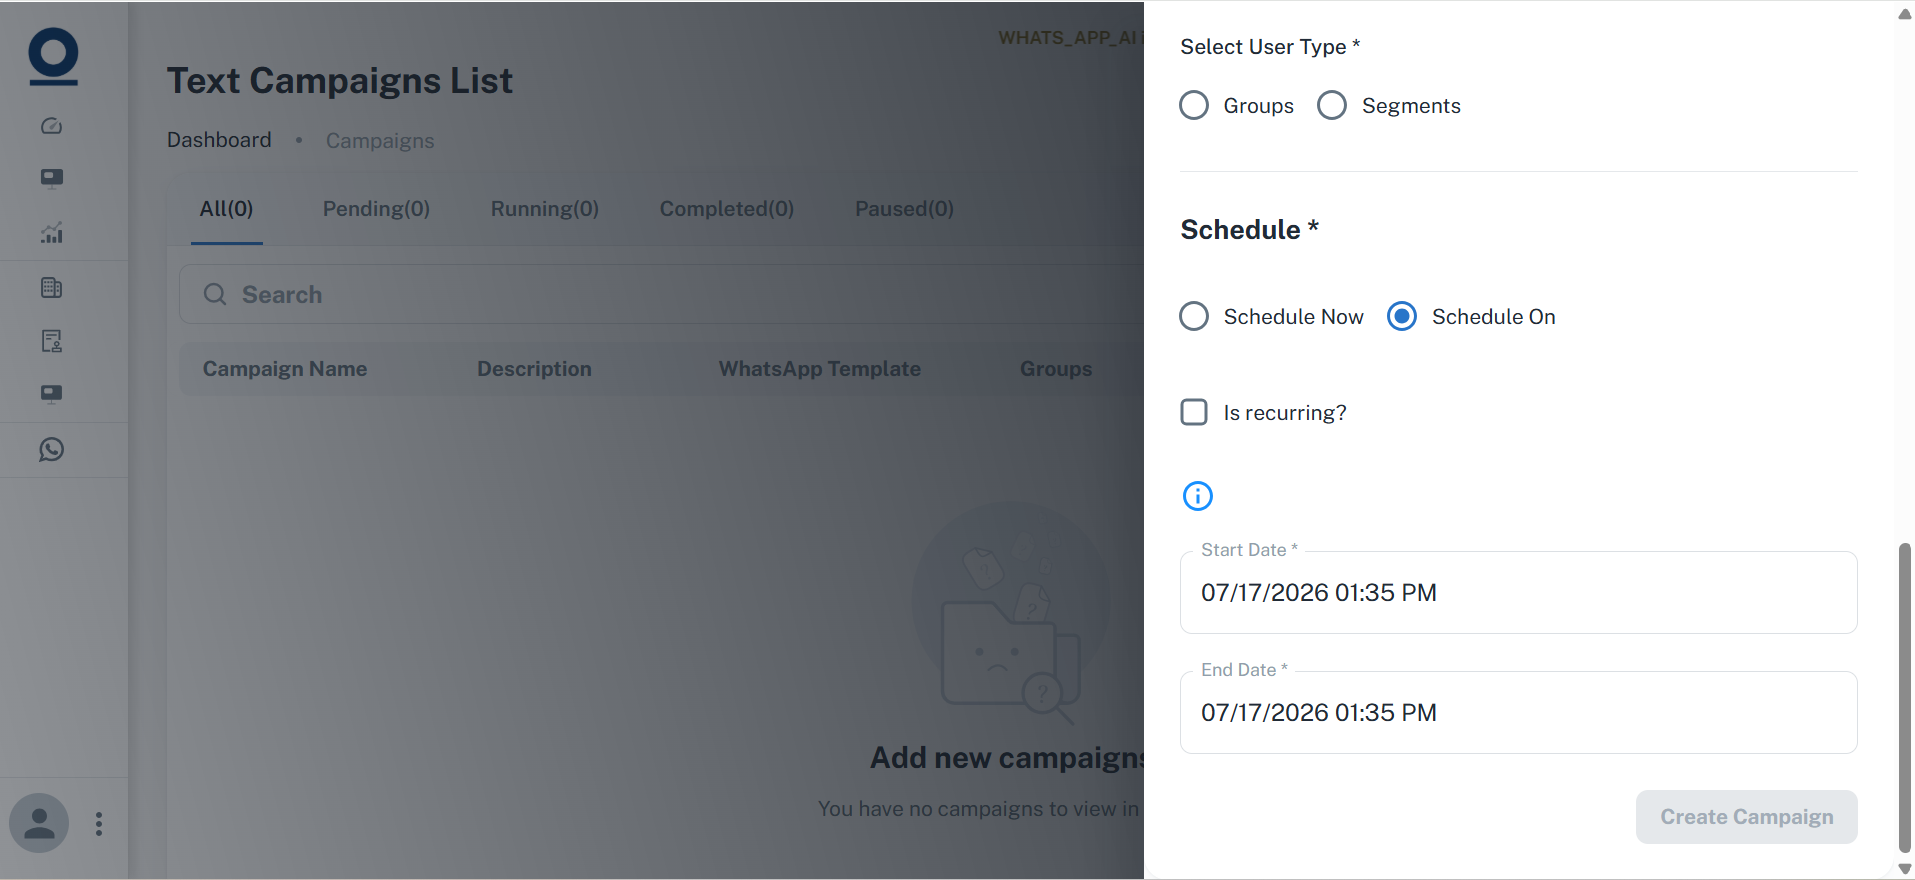
- Choose Schedule Now or Schedule On.
- Click Create Campaign.
Manage Customers & CRM Groups
Instead of uploading customer data every time, you can organize contacts using the CRM Module. Customer Groups simplify audience management and make recurring campaigns much easier.
Create a Group
- Click the three-dot (⋮) menu.
- Select CRM Module.
- Open Groups.
- Click Add Group.
- Enter Group Name and Group URL.
- Click Create Group.
Add Customers
Navigate to CRM Module → Customers. Click Add Customer. Enter:
- Customer Name
- Mobile Number
- Handle (Email Field)
- Department
- Customer Group(s)
Click Create Customer. For multiple customers, use the Upload CSV option.


Create Campaigns Using Customer Groups
While creating a campaign:
- Select Groups instead of Upload CSV.
- Choose one or more Customer Groups.
- Complete the remaining campaign details.
- Click Create Campaign.
Every customer associated with the selected groups will automatically receive the campaign.
Best Practice
Maintain separate customer groups such as:
- Leads
- Existing Customers
- Premium Customers
- Regional Customers
This improves campaign targeting and audience segmentation.
Expected Outcome
- Launch campaigns instantly
- Schedule future campaigns
- Target audiences using CSV or Customer Groups
- Reuse groups across multiple campaigns
Monitor Campaign Analytics
Once your campaign is successfully executed, ODIO provides detailed analytics to measure campaign performance and customer engagement.
Access Analytics
- Navigate to Analytics.
- Open the History tab.
- Open the Conversations tab.
Campaign Insights
The Analytics Dashboard includes:
- Campaign History
- Campaign Performance
- Individual Conversation Details
- AI-generated Conversation Summaries
- Delivery Status
- Customer Engagement Metrics
- Message Status
Conversation Details
Selecting any customer conversation displays:
- Customer Information
- WhatsApp Business Number
- Complete Conversation History
- AI-generated Summary
- Message Delivery Status
- Conversation Analytics
Best Practices
- Review analytics regularly.
- Monitor failed message deliveries.
- Track customer engagement.
- Use insights to optimize future campaigns.
Expected Outcome
After completing this section, you'll be able to monitor campaign success, analyze customer conversations, and improve WhatsApp engagement.
Frequently Asked Questions
How long does Meta take to approve templates?
Most templates are approved within 24 hours, although review times may vary.
Can I use my existing WhatsApp Business Number?
Yes. Disconnect it from any existing WhatsApp account before registering it with ODIO.
Can I send campaigns without an approved template?
No. Only Meta-approved templates can be used for outbound campaigns.
Can I schedule campaigns?
Yes. Choose Schedule Now or Schedule On while creating the campaign.
Can I import customers in bulk?
Yes. Use the Upload CSV option within the CRM Module.
Can I reuse Customer Groups?
Yes. Customer Groups remain available for all future campaigns.
Can multiple departments be created?
Yes. Create departments based on your organizational structure.
Where can I monitor campaign performance?
Campaign reports are available under Analytics → History and Analytics → Conversations.
Next Steps
Congratulations! 🎉 Your WhatsApp AI workspace is now fully configured and ready to automate customer communication.
By following this guide, you have successfully:
- Created your ODIO account
- Activated your WhatsApp AI subscription
- Configured your workspace
- Created departments
- Connected your WhatsApp Business Number
- Created Meta-approved Message Templates
- Built chatbot workflows
- Launched WhatsApp campaigns
- Organized customers using CRM Groups
- Monitored campaign performance through Analytics
As your business grows, continue refining templates, optimizing workflows, organizing customer groups, and reviewing analytics to deliver better customer experiences.
Need Help?
If you encounter any issues while setting up WhatsApp AI, contact the ODIO Support Team or your dedicated account manager for assistance.
You can also explore additional product documentation in the ODIO Help Center as more guides become available.